How to Make Labneh (Yoghurt Cheese)
Labneh is a super creamy, deliciously tangy, strained yoghurt cheese. This easy labneh recipe shows you how to make labneh at home. Top it with za’atar, harissa or roasted tomatoes and serve with flatbreads for a quick appetiser.
Calling how to make labneh a recipe is perhaps a bit of a stretch. It takes two ingredients (yoghurt and salt) that you mix, strain and store. As simple as that.
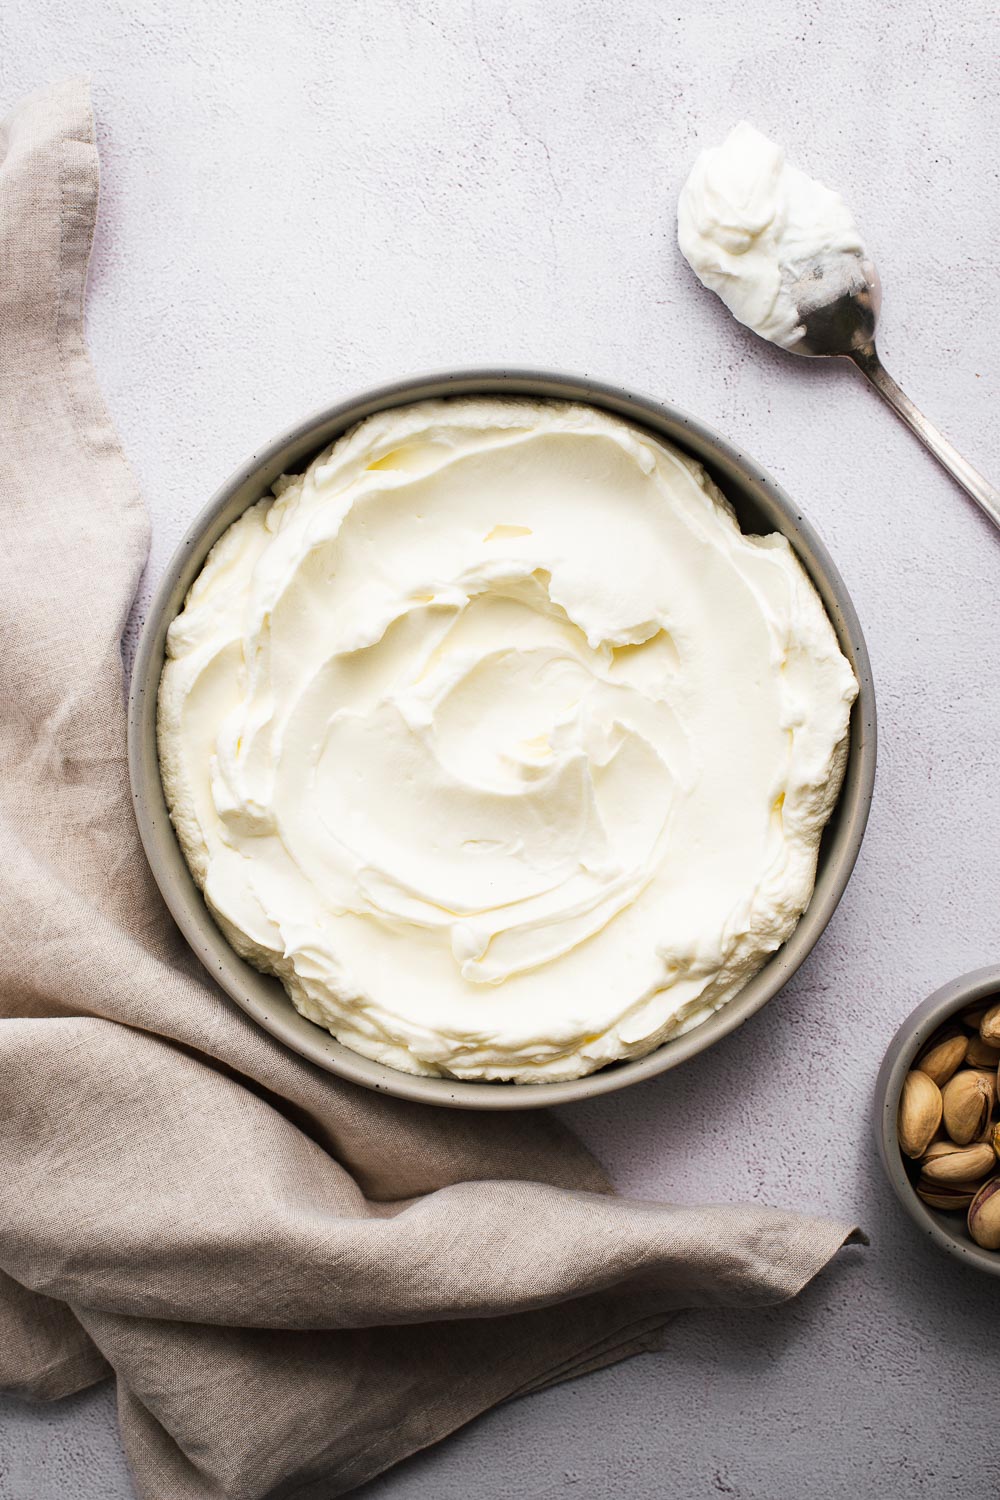
Top it with extra virgin olive oil, za’atar, sumac, pistachio nuts and a sprinkle of flaked salt for a delicious dip for crunchy crudités. Or serve it as part of a mezze spread with toasted pita bread or flatbread.
Ready to give it a try? This post teaches you how to make labneh with yoghurt, which yoghurt is best for labneh, and how to eat labneh. You’ll regret not making homemade labneh sooner!
What is labneh?
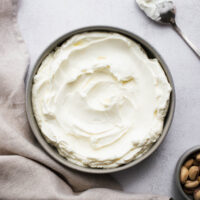
Labneh (also spelt labne, lebneh, or lebni) is a creamy Middle Eastern cheese made from strained yoghurt. Straining the yoghurt reduces the liquid whey content and turns it into a spreadable yoghurt cheese with a creamy texture and slightly tart flavour.
The longer you strain it, the thicker the labneh becomes. Traditionally, labneh uses whole milk yoghurt, but you can use Greek yoghurt or goat milk yoghurt for a tangier flavour.
Strained yoghurt cheese is a staple ingredient in Mediterranean and Middle Eastern cuisine.
It is delicious spread on flatbreads or toast. Or serve it as part of a mezze spread with toppings. You can even use it in cooking instead of plain yoghurt to reduce the risk of curdling.
Why you’ll love labneh
I adore labneh for its deliciously tangy flavour and super creamy texture, but there are many reasons to love labneh:
- It’s versatile: Enjoy labneh on a mezze platter, as a dip with crackers, or in sandwiches and wraps.
- It requires simple ingredients: All you need to make labneh is yoghurt, salt and some patience.
- It’s easy to make: Stir in salt, then strain the yoghurt until it’s thick and creamy. That’s all you need to do!
- It stays fresh: Refrigerated with olive oil in an airtight container, labneh stays fresh for months.
Labneh ingredients
You essentially only need two ingredients. The rest is optional.
- Yoghurt: Use plain full-fat yoghurt for the creamiest labneh. You can also combine goat’s milk yoghurt and cow’s milk yoghurt for a tangy labneh.
- Salt: Use a teaspoon of fine sea salt for every kilogram of yoghurt.
- Extra virgin olive oil: Olive oil is not strictly necessary when making labneh. You can simply refrigerate the strained yoghurt cheese in an airtight container. But adding a layer of olive oil extends the freshness.
- To serve: Za’atar, sumac, pistachio nuts and flaked salt are all excellent toppings for labneh. Or try lemon juice, lemon zest, fresh herbs, or chopped olives. See more labneh serving suggestions for labneh.
Which yoghurt works best for labneh?
Greek yoghurt (or Greek-style yoghurt) is a creamy strained yoghurt. Some labneh recipes require Greek yoghurt specifically – others refer to labneh as Greek Yoghurt.
It can all get a bit confusing. But essentially, you can use any full-fat natural yoghurt.
It’s best to avoid flavoured or fat-free varieties.
I use a double cream plain yoghurt that delivers a luxuriously thick and creamy labneh. If you use your favourite full-fat natural yoghurt, you will also love the taste of the resulting labneh yoghurt.
For a tangy twist, try making labneh from goat’s milk yoghurt.
From one kilogram (about 3½ cups) double thick yoghurt, I make two generous cups of labneh. Your yield depends on the type of yoghurt you use and how long you strain the yoghurt.
How to make labneh
Making homemade labneh could not be simpler. You only need two ingredients (full-fat natural yoghurt and salt) and muslin (cheesecloth) or a clean tea towel.
Using a fine mesh strainer to suspend the yoghurt over a bowl makes refrigeration easy. But I suggest alternative techniques if you don’t have a strainer.
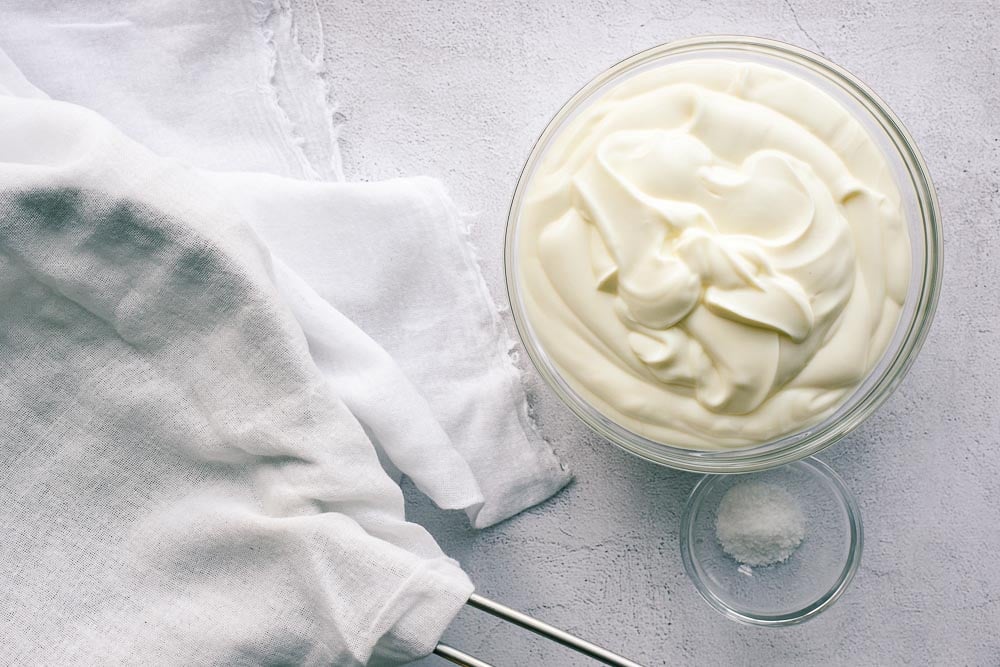
Step 1: Mix yoghurt and salt
Start by mixing the yoghurt and salt. I use a teaspoon of kosher salt for every kilogram of yoghurt.
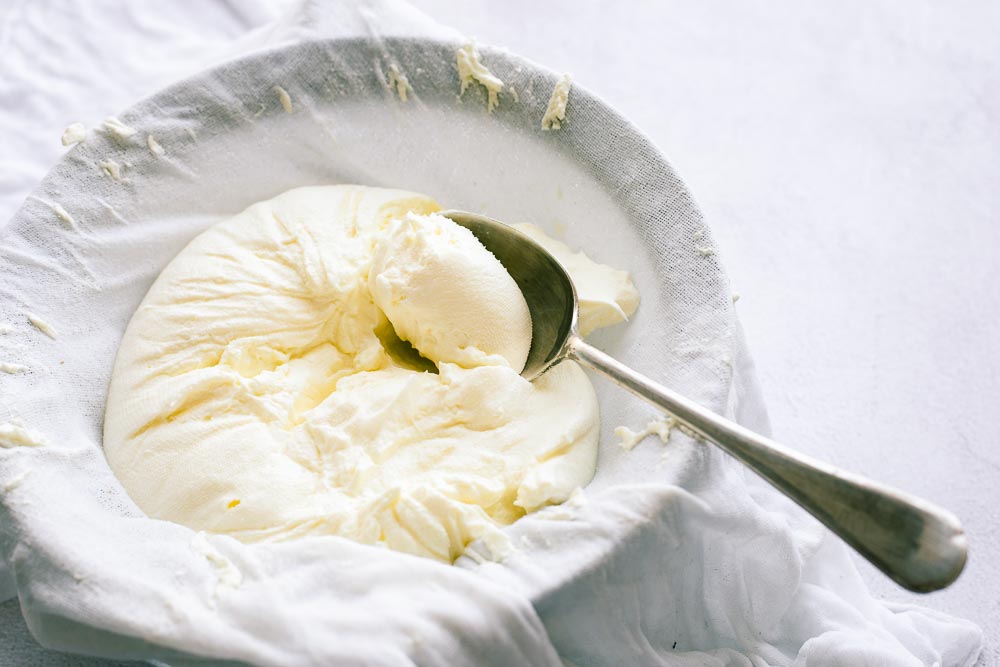
Step 2: Strain the yoghurt
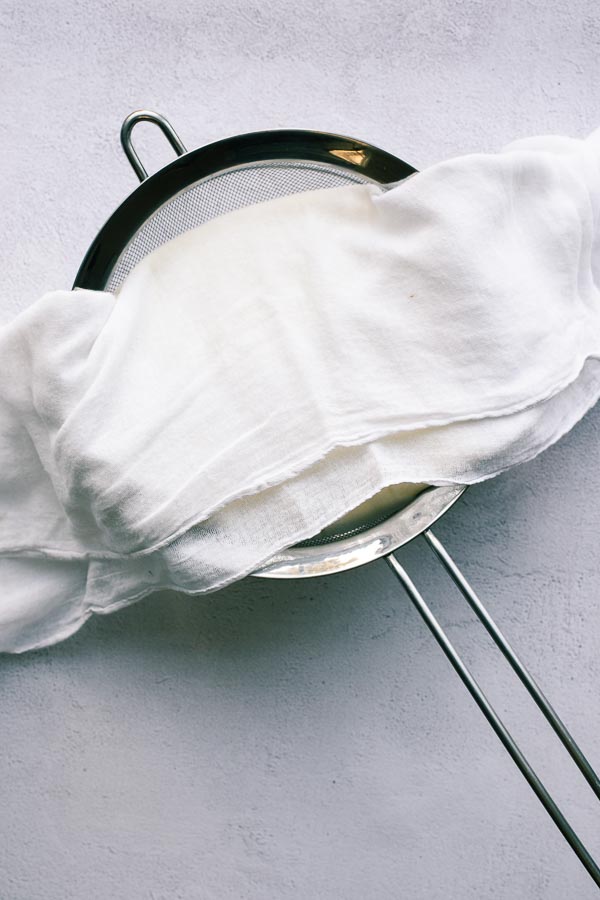
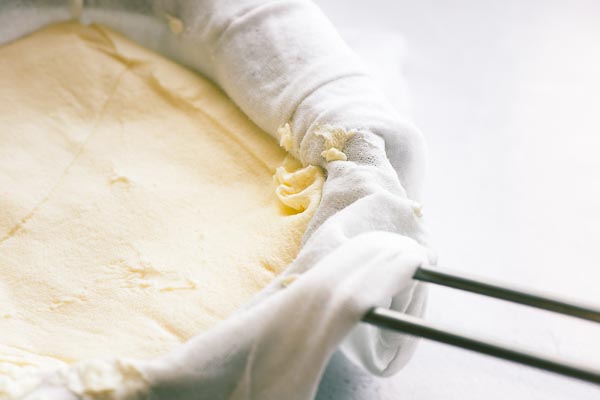
Place a sieve over a large bowl and line it with muslin (cheesecloth) or a clean kitchen towel.
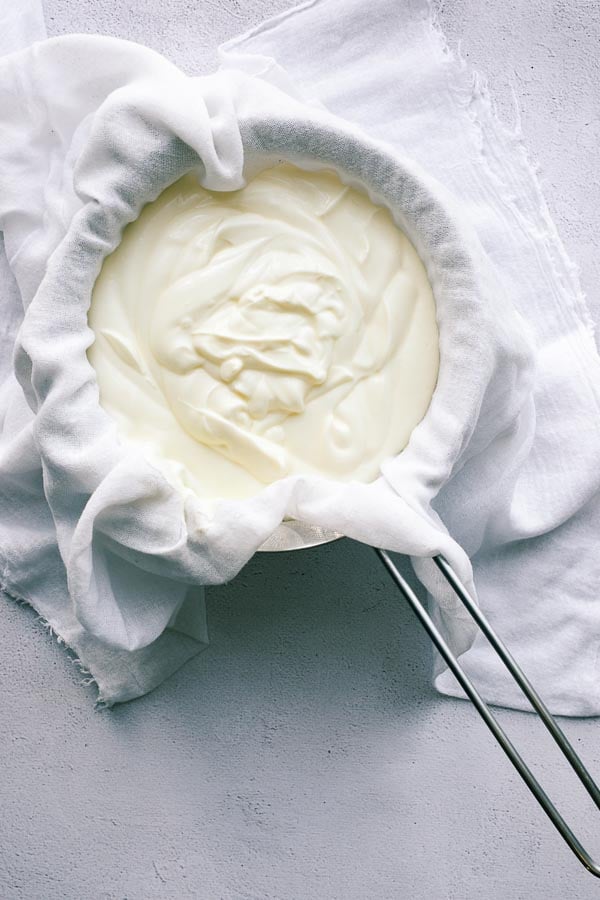
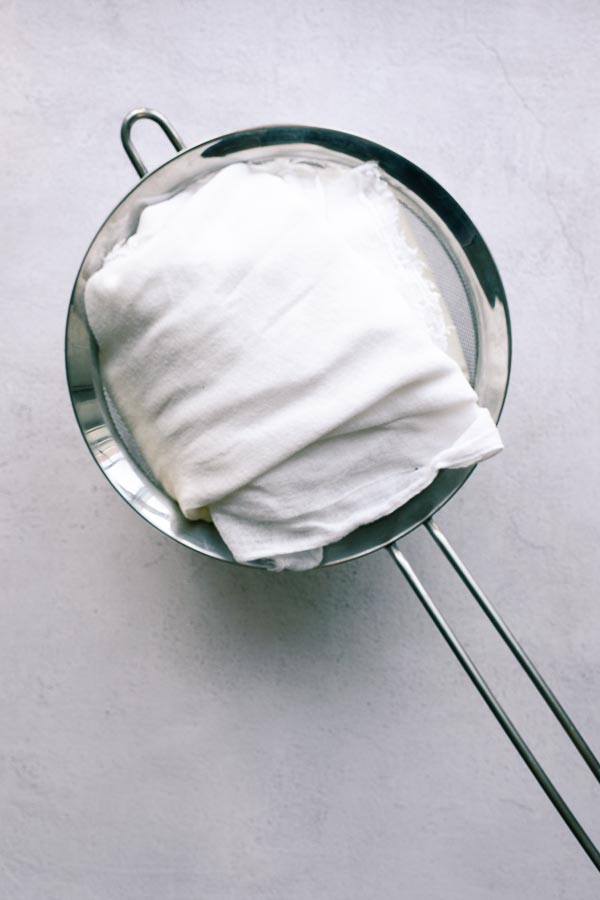
Spoon the yoghurt mixture into the muslin-lined sieve. Secure the yoghurt inside the muslin by folding the muslin or tying it together with string.
Yoghurt should not be able to bypass the fabric and spill through the sieve. It needs to filter through the muslin.
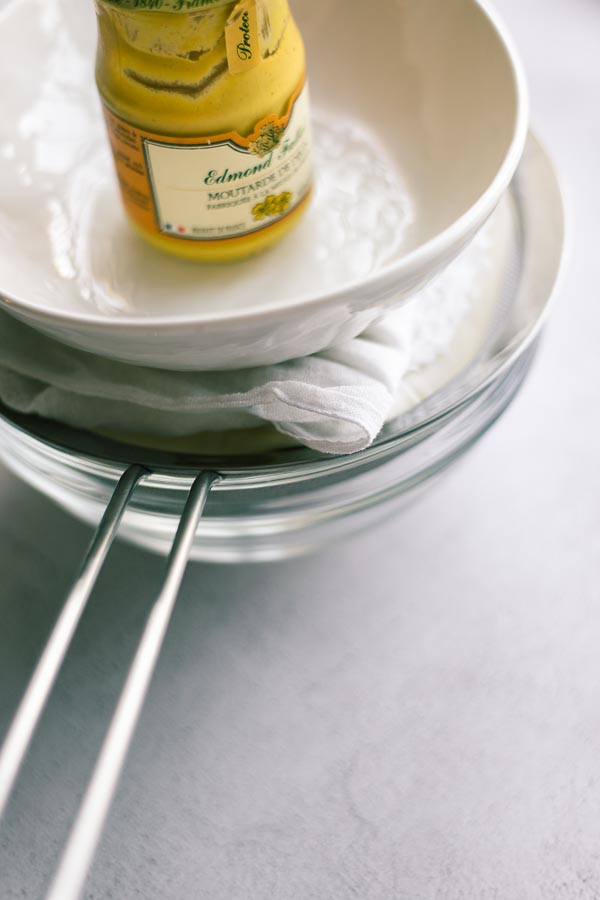
Step 3: Place a weight on top
Place a small weight on top of the covered yoghurt.
I use a plate and a condiment jar from the fridge. The extra weight helps to squeeze out the whey.
Step 4: Refrigerate
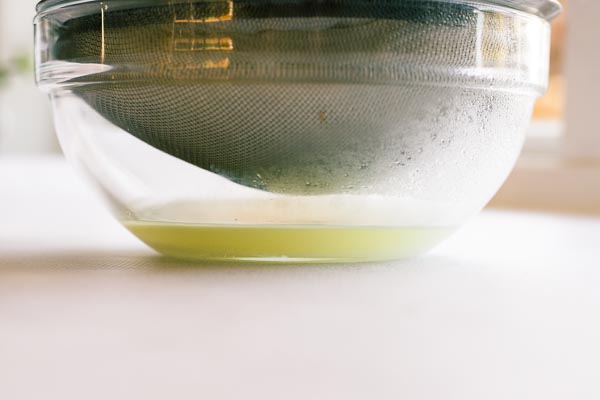
Place everything in the fridge and leave to strain for 24 to 48 hours.
After a few hours, you will see whey collecting in the bowl. And the yoghurt will start to thicken. The above images show double cream yoghurt strained for 12 hours.
Your results will differ depending on the type of yoghurt you use.
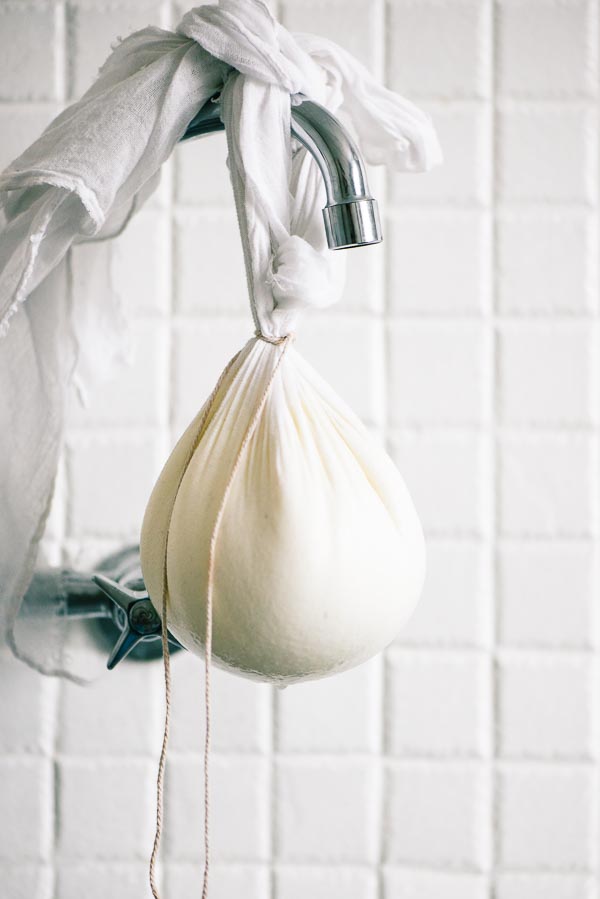
Alternative straining method
Alternatively, secure the yoghurt inside the muslin (or tea towel) with string.
Hang the parcel somewhere to strain – like a wooden spoon balancing over a large bowl, or tie the string to a tap over the kitchen sink. It will still need to strain for at least 24 hours.
I prefer to put the yoghurt in the fridge while straining, especially in the warm summer months. It makes the sieve method more convenient.

How to strain yoghurt faster
The wait is seriously the most challenging part of the process.
Tip 1: Squeeze it
If you are in a rush, you can speed things up by gently squeezing some whey out with your hands. But take care not to squeeze the yoghurt through the fabric.
The whey is a yellowish liquid. So as soon as you see white drops of yoghurt appearing on the fabric, you need to back off.
Tip 2: Replace the cheesecloth
The muslin absorbs lots of liquid while wrapped around the yoghurt. To speed things up, replace the soaked muslin cloth with a dry one and give the yoghurt another gentle squeeze.
Use the leftover liquid whey to make flatbreads
Don’t discard the liquid whey you drained from the yoghurt – it’s packed with protein. Add it to smoothies or use it as a cooking liquid. I use it to make quick flatbreads to serve with the labneh.
You don’t have to use the whey straight a-whey (I couldn’t resist). Store it in a sealed container in the fridge.
Several sources say that whey can last for weeks in the fridge as long as it is only whey – so no yoghurt made it through. But I prefer to use it within a few days of straining.
To make quick and easy no-yeast flatbreads, use this recipe for yoghurt flatbreads. But for each 1½ cup of flour (180 grams), use half a cup of liquid whey and one tablespoon of olive oil to replace the yoghurt in the recipe.
The dough is a bit more sticky this way, so flour your rolling pin and surface liberally.
Related Post: Quick and easy (no yeast) yoghurt flatbreads
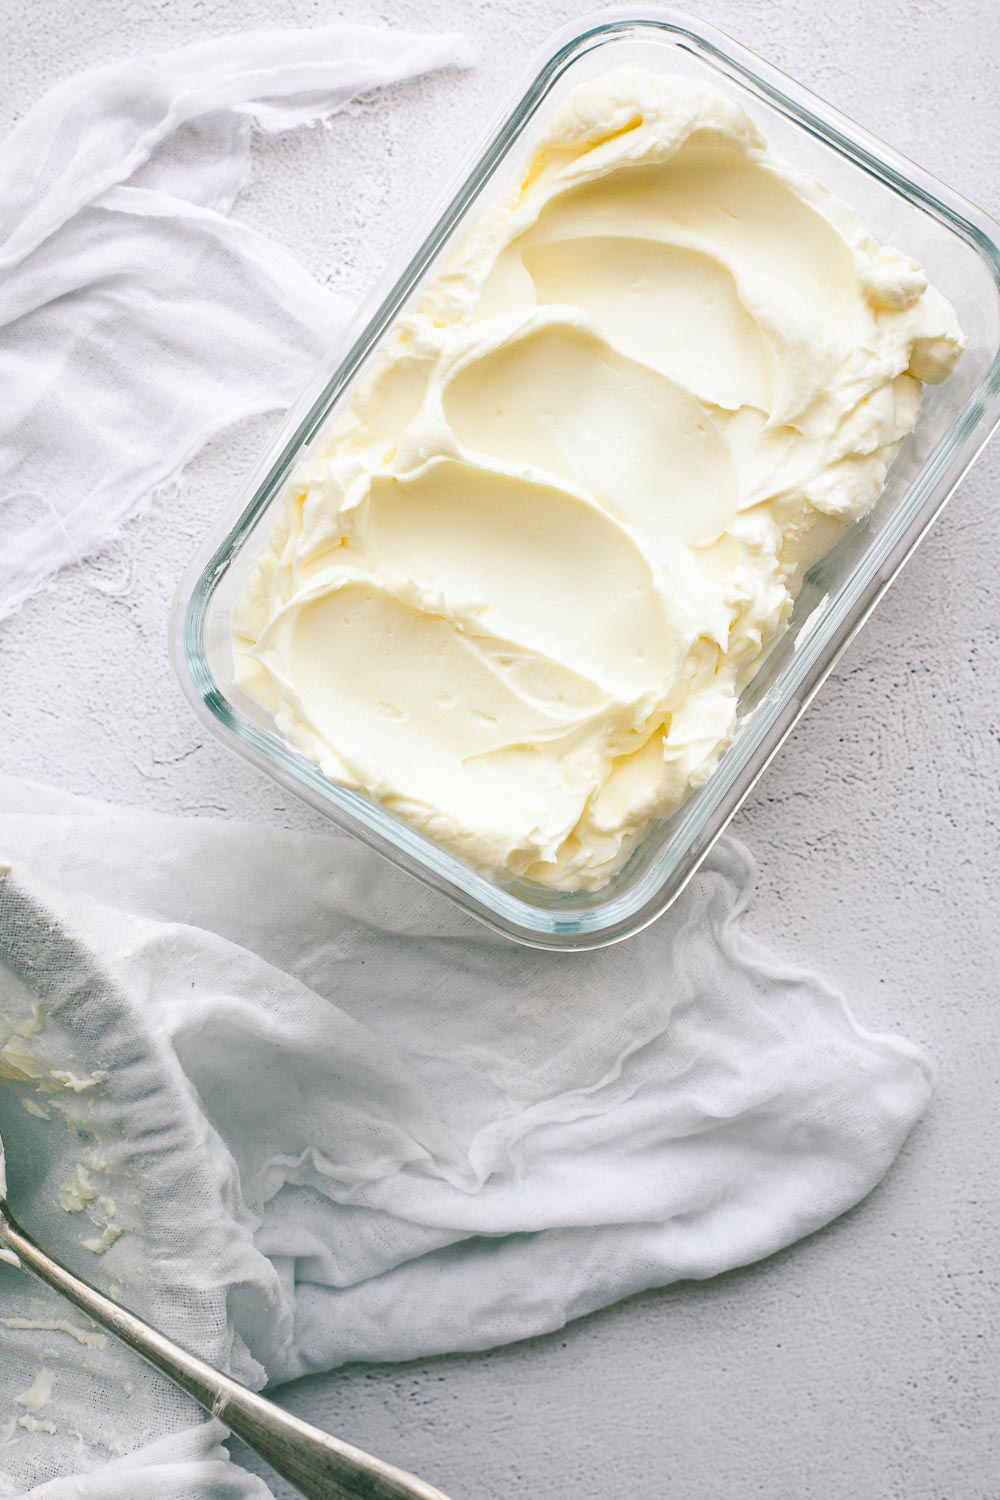
How to store labneh
You can store labneh in the fridge in a clean, sealed jar for about two weeks.
If you need to preserve it for longer, add enough extra virgin olive oil to completely cover the yoghurt cheese. Stored like this, it will keep up to a month in the fridge.
The olive oil will solidify at the cold temperature. Just bring the container to room temperature to pour off the olive oil.
Use the olive oil in salad dressings or drizzle over the labneh when serving as a dip.
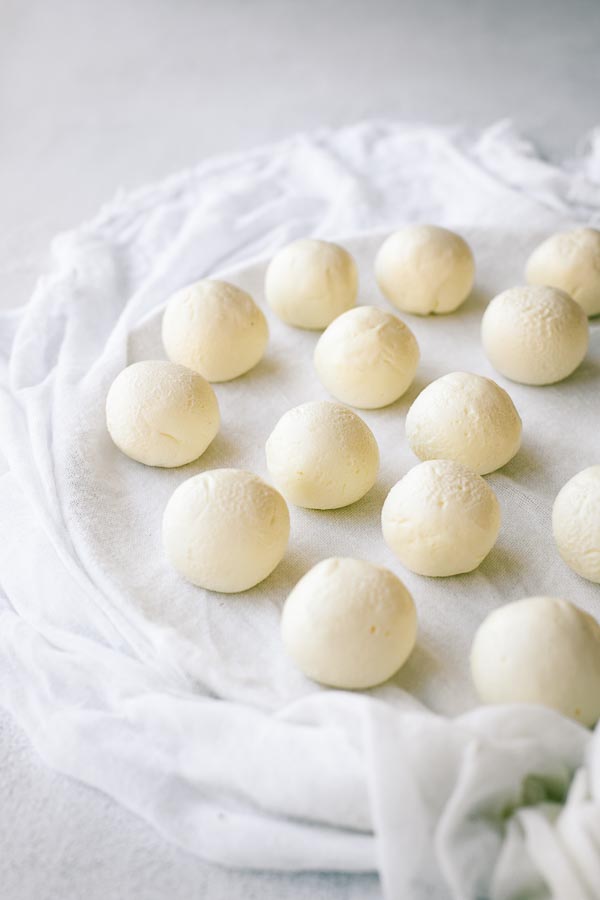
You can also roll the labneh into small balls, leave them to set in the fridge overnight and then store them in a jar of olive oil for up to one month. See garlic and herb labneh balls in olive oil for the full instructions
Related Post: Garlic and herb labneh balls preserved in olive oil
How to use labneh
If you’ve fallen in love with labneh, welcome to the club! It is a versatile ingredient to have in the fridge.
Here are a few ideas to get you started with your homemade labneh.
- Spread: Generously smear labneh cheese on an everything bagel like cream cheese. It makes a great addition to avo toast, and it adds a luxurious touch to simple boiled eggs on toast when sprinkled with sumac or za’atar.
- Dip: Labneh makes an exciting dip for pita chips or fresh veggies. See the instructions for the classic za’atar topped labneh below, as well as a range of different topping ideas.
- Classic mezze: Pair it with other Middle Eastern dishes like hummus, baba ganoush (eggplant dip), and muhammara (Lebanese red pepper dip). Add marinated olives and a pile of warm pita bread for a real feast. Or try it in this falafel platter.
- Sauce: Use labneh to add a creamy touch to roasted vegetables. Generously spread labneh on a serving platter and top with saucy roasted vegetables like harissa butter roast cauliflower, harissa maple roasted carrots, or charred broccolini with preserved lemon.
But the usefulness of labneh extends beyond spread and dip. You can use it in cooking as you would yoghurt. Labneh does not curdle as quickly as unstrained yoghurt does when heated.
Molly Baz has a delicious recipe for “Brown Butter & Labneh Banana Bread Cake”. The recipe is from her first cookbook, Cook this book: Techniques That Teach and Recipes to Repeat, and it is one of my favourite banana bread cakes out there.
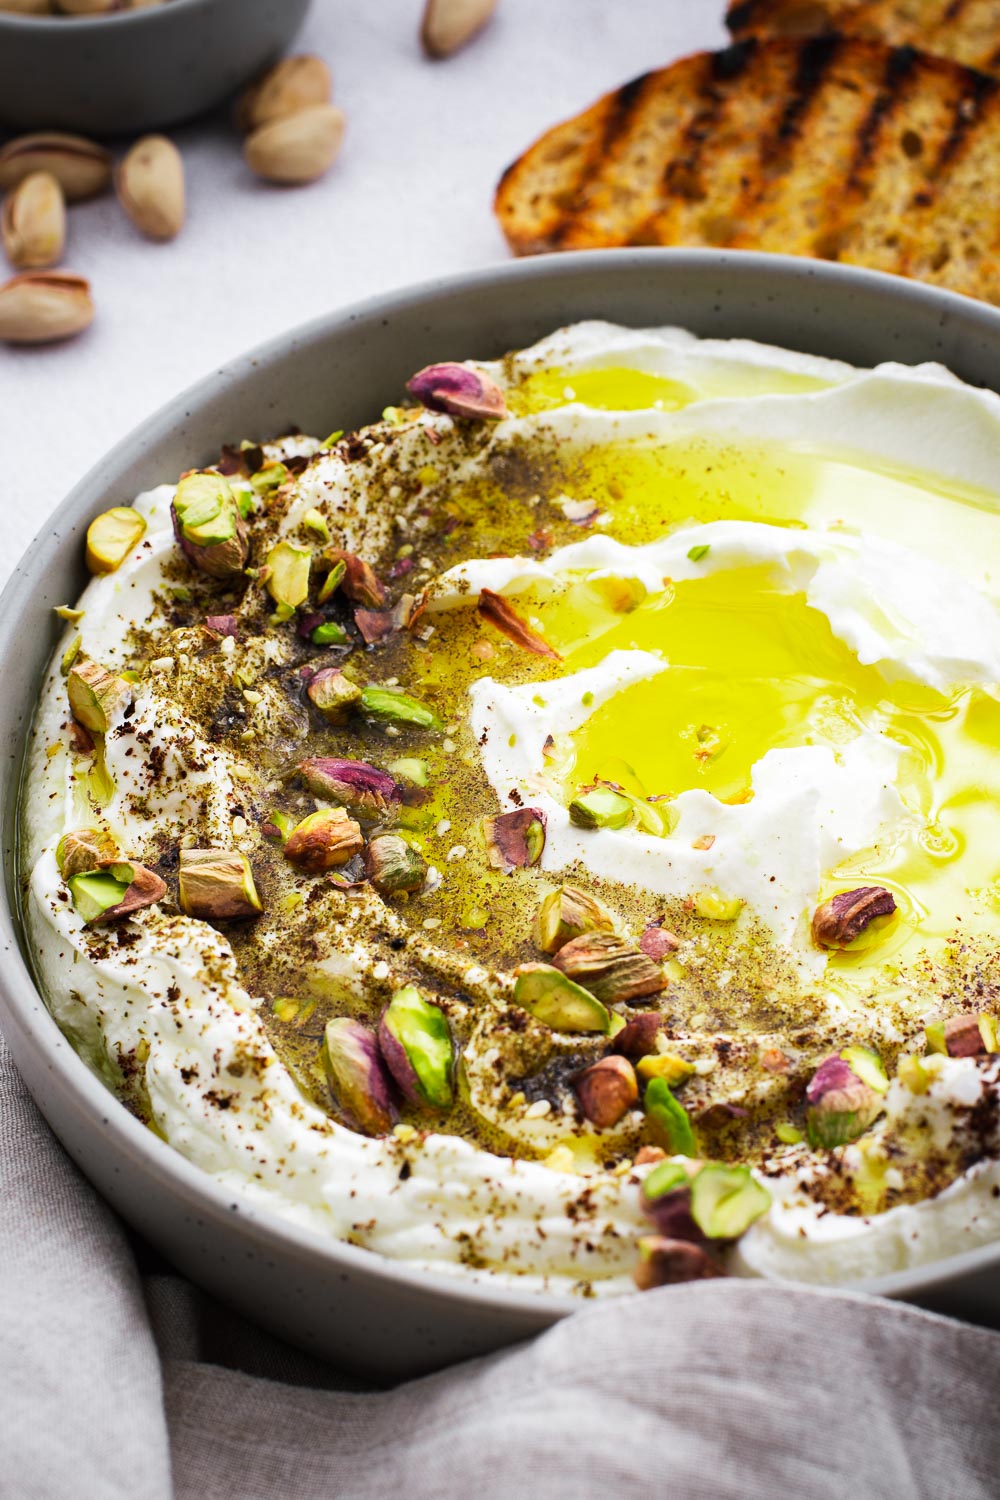
Labneh with Za’atar
Spread the labneh cheese in a shallow bowl and use a spoon to create a textured surface.
Drizzle with good quality extra virgin olive oil. Sprinkle with a tablespoon of za’atar, a few pinches of sumac and flaky salt.
You can also add toasted pine nuts or chopped pistachios. Serve it with toasted pita triangles, sourdough, or flatbreads (try these quick and easy yoghurt flatbreads).
Or try some of these labneh topping ideas:
- Harissa: Mix equal parts harissa paste and extra virgin olive oil. Pour the sauce over the labneh and finish with a sprinkling of salt.
- Roasted tomatoes: Similarly, harissa roasted cherry tomatoes are a delicious labneh topping. Or try this quick pan-cooked version for sweet and spicy tomato sauce on labneh.
- Chopped olives: Roughly chop stoned olives, garlic and parsley and mix with toasted pine nuts before scooping over the labneh. Finish with a teaspoon of sumac.
- Lemon and herbs: Mix the juice and zest of a lemon with salt, olive oil and chopped herbs such as mint, parsley, coriander and dill. Pour it over the labneh and serve.
- Figs, pistachios and tahini-honey: You can even go sweet. Top the labneh with fresh figs, pistachios and tahini honey sauce for a quick no-fuss summer dessert.
Labneh cheese is more than just a tasty toast topper or dip. And did I mention how easy it is to make? So go on, buy your yoghurt in bulk and make some yoghurt cheese.
Frequently asked questions
Yes, you can use labneh as a substitute for Greek yoghurt in many recipes. It is particularly good in savoury dips, spreads, and sauces. Labneh is thicker than Greek yoghurt and often contains salt.
Line a strainer with a clean kitchen towel to strain yoghurt. For thick Greek yoghurt, you can also use an unlined fine mesh strainer like a bouillon strainer. Or use a large coffee filter.
Thin paper towels get soaked and stick to the yoghurt – they’re not great for straining yoghurt. But you can use very thick paper towels, though cotton cloths like cheesecloth (muslin) or a clean tea towel works best.
A typical store-bought sieve won’t work to strain yoghurt or cheese. But you can replace cheesecloth with a very fine mesh strainer like a bouillon strainer for some uses. Or use a large coffee filter bag.
Spoon yoghurt into a cheesecloth-lined strainer, tie the cloth together, and top with a plate and weights. Use your hands to gently squeeze whey from the yoghurt bundle to speed things up. And replace the cheesecloth when it is soaking wet.
Middle Eastern recipes to serve with labneh
- Harissa roasted cauliflower: A buttery, spicy and indulgent vegetarian main to serve with Persian yoghurt.
- Barley pilaf with rose harissa: An easy Middle Eastern pilaf to pair with mast-o khiar.
- Arabic salad: A classic Middle Eastern-style chopped salad to serve alongside the yoghurt side dish.
- Kuku sabzi: An easy Persian herb frittata recipe packed with greens and just enough eggs to hold it all together.
- Crispy Middle Eastern falafel: Authentic Middle Eastern falafel with a crispy exterior and a soft and fluffy herbed interior. Or try baked falafel (using canned chickpeas) for a convenient alternative.
Equipment
- Cheesecloth (muslin cloth)
- Mesh strainer – or sieve
Ingredients
- 3½ cups natural yoghurt *
- 1 teaspoon salt
- extra virgin olive oil , only necessary for extended storage
To serve (optional)
- 1 tablespoon za'atar
- ½ teaspoon sumac
- 2 tablespoons pistachio nuts , roughly chopped
- flaked salt
Instructions
- Mix the yoghurt and salt in a bowl.
- Line a sieve with cheesecloth (muslin cloth) or a clean tea towel. Place it over a large mixing bowl and spoon the salted yoghurt into the cloth-lined sieve. Cover the yoghurt by folding over the muslin or tying the ends together with string.
- Place a small weight on top of the covered yoghurt. I use a plate and a condiment jar from the fridge. The extra weight helps to squeeze out the whey.
- Put everything in the fridge and leave the liquid to strain off for 24 to 48 hours. The longer you strain it, the thicker the labneh.
- To store, place the labneh in a clean, sealable jar. It will keep for about two weeks in the fridge. Or, to preserve it for longer, cover the labneh with a layer of extra virgin olive oil. This way, it will last for months.
- To serve, spread the labneh in a serving bowl and create ridges with the back of a spoon. Add toppings and enjoy with toasted pita triangles or flatbreads.
Notes
- Use any full-fat natural yoghurt – Greek yoghurt works well. The choice of yoghurt will determine the flavour of the labneh. Use goat’s milk yoghurt for a tangy cheese, stick to cow’s milk yoghurt for a mild flavour, or combine the two types.
- Use plant-based yoghurt for vegan yoghurt cheese.
- If you don’t have a fine mesh strainer or sieve, tie the muslin (cheesecloth or kitchen towel) together using string and hang the yoghurt-filled muslin ball over a bowl (or over the sink) to strain.
Try another homemade condiment
- How to make preserved lemons
- Shatta (Middle Eastern hot sauce)
- How to make black limes
- Homemade rose harissa paste
Find more exciting condiment recipes.
This recipe is so easy. I’m never buying labneh in the shop again!
I know, right? I adore homemade labneh.